Filling and repairing defects in metal part 1/2
06-12-2021
0
Today we will discuss restoring the original condition of parts that have worn out during operation. This is e.g.
filling cavities in worn parts,
restoration / repair of e.g. a broken / loose bearing seat,
total and partial cracks in elements,
repair / reconstruction of missing elements, e.g. regeneration of torn threads or pipe flanges
other repairs involving several aspects, e.g. refurbishment of steel tanks and barrels.
Repairing all kinds of defects in metals and leveling the surface is very simple. For this we use metallic masses called liquid metal in a version for a given surface. We make as follows:
- grind the entire surface, 1-2 cm more than the defect, removing old layers, oxides, etc., additionally making hook points by roughening the surface
- we degrease
- we apply the selected mass in thin layers until the defect is filled (if it is, for example, a sleeve and we have the option of mounting it on a lathe, it will speed up the work because at slow speed we can apply subsequent layers very quickly).
- we always put more mass so that there is "something" to collect later
- for gaps below 2 mm. we should heat the surfaces to 50-70 degrees, rub the first layer and heat it so that the product becomes smoother so that it can penetrate into smaller gaps,
- when the losses are greater than approx. 4-5 mm. it is worth using a metal mesh - it will help us achieve thickness and strengthen the whole
- the whole is left to harden.
- after 24h. heat it for a few minutes, setting it to about 150 degrees on a heat gun. (if we have a heat gun without regulation, we only use 2 gears of 300 and 500 degrees, setting the lower one, we heat from a distance of 30-40 centimeters)
- after cooling down, if we have excess, we grind, mill and roll
- if we still need to even out - grind the surface, clean it and repeat the above steps
What else is important when we repair cavities?
- for heating we can use heat guns - hot air blowers, flames, etc. Generally - devices that give the temperature - do not use fire. The exception is when we want to quickly heat the surface before applying the adhesive,
- Always mix this type of mass and other adhesives on glass, stone, metal, plastic (preferably pp / pe / pom / ptfe), never on paper or wood in which they can draw liquid components from liquid metal
- we always perform repairs in positive temperatures, i.e. min. +5 degrees, preferably +15 and more. If we are to glue at negative temperatures, the surface must have min. 15 degrees. Preheat the surfaces until they reach min. 50 degrees, because only then we can remove moisture from the surface (we can do the whole thing for up to 1.5 hours, getting a temperature of about 80 degrees for 1.5 hours - for more details, see the instructions with the product)
And now we will discuss specific, example cases:
Torn thread repair:
Cases:
- if the thread is worn - too loose, it turns
- completely torn out,
- we want to reduce the thread diameters,
- plug the screw hole completely (al21 / fe21 / med21)
Activities:
- we clean surfaces and grind and roughen.
- if we want to recreate the thread - and the screw is to be unscrewed, then: flood the entire hole with small portions, heating it each time so that they melt and leave no air inside,
- leave until fully hardened,
- we thread to the size we need,
- if you want to completely cover the hole or screw in the screw permanently: clean the body and screw the screw, apply / pour glue inside to about half of the thread (diagram as above),
- put glue on the screw and insert,
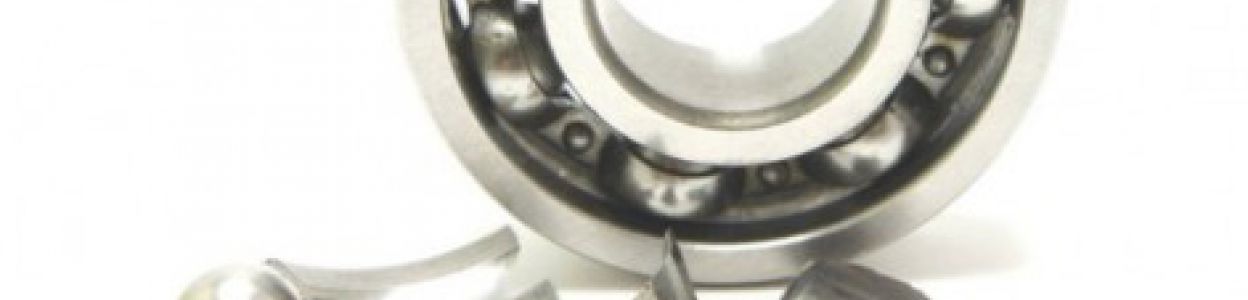
Opening the seat - regeneration of the worn bearing - insertion of the bushing
- if the knocked out seat is completely good and there is only a clearance of 0.1-0.2 mm, then glue the bearing on anaerobic glue of the ATK LOCK 43 or 850 series
- if the socket has a clearance of up to 0.5mm. - stick "permanently" on the ATK EP 61 epoxy glue - in this and the above case, apply the glue on 2 surfaces and slowly rotate it so that the glue remains between the surfaces,
- if the seat has a clearance of more than 0.5 mm. we basically say that it is not there, in this case we prepare the surfaces as discussed, also grinding the bearing / bushings. We put the selected version of the Kemispox al21 / fe21 / med21 adhesive by heating it to make it smoother and put it in a rotating motion so that the adhesive remains between the surfaces; we collect the excess and balance it; if too little is poured into the slots by heating.
Pipe flange regeneration in industrial installations and more:
- we clean surfaces physically and chemically,
- good or new side - lubricate with a separator - it can be the so-called trennmitel or other available agents on the market, e.g. based on silicone - that will not stick to the part being played,
- we put the product on the damaged part,
- we press and / or twist the whole thing and collect the excess - if there is not enough, we add it,
- after hardening, unscrew and the part is formed
- the resulting excess, e.g. inside, is cut or grinded depending on where it is located,
- we screw the whole thing onto the original gasket or put a liquid gasket, e.g. KEMISKOL T055 (more about caulking described in this post)
Important:
We can perform this type of reconstruction work on other elements, not only on pipe flanges. It is enough for us to use one element as the reverse / obverse to impress the other surface so that there are no unnecessary and time-consuming treatments later.
Complete and partial cracks - e.g. torn / torn handles
- if the element does not carry heavy loads, the whole can be flooded with Kemispox so that the thickness is min. 3-4mm - so that he "has something to hold". Of course, by grinding the entire surface and degreasing, we can additionally use a sheet / angle for reinforcement, embedding the whole.
- if the element is to carry significant loads, the repair is carried out as follows:
- we clean the surfaces and degrease
- we bend flat bars, sheets, etc. to the shape of the element so that the overlap is min. 1-2cm. (it will be an additional reinforcement - (they do not have to fit perfectly)
- we apply glue to the butt and to the bent sheets / angles
- the whole is "folded", pressing lightly so that the adhesive remains between the surfaces at least 0.2mm.
- we leave the glue to harden: Acralock SA 1-15 - initially 1h, full 6h; ATK EP 61 - initial 4, full 24h.
Other repairs:
if parts require a few steps of repair, e.g. regeneration of steel or sheet tanks where there is damage / holes that need to be filled, then level the surface and finally glue additional protections, all elements are made one after the other as described in this article, remembering that the next products should bind completely - then they won't react with each other.
Questions:
1. I have an unusual situation, I do not know how to start the repair and what product to choose:
It is best to contact us, we will select the product, we will explain what steps you should take to make the repair effective.
2. Can such repairs be done at home?
As much as possible, if you have a heater, file, wire brush and sandpaper, you have everything you need, the rest you will get from us with the product.
We encourage you to read the second part of the article.
Comments